Friday 28 October 2016

What is this Hirst Arts?


So one of the constant thing's I see on social media circles is people posting photos of Hirst Art terrain that they have made. The response is always fantastic and there's always a handful of people who reply stating they wish they could afford or were artistic enough to create such terrain.

First off, if you are one of those people get on over and join DM Scotty's Craft N' Games. It's a Facebook group dedicated to creating terrain and RPG material. It's focus is on making things from cheap household items and the stuff you see posted daily is incredible.

However, just from reading my blog you should know that I work mainly with Hirst Arts. Bruce Hirst is the artist responsible for Hirst Arts. He creates silicon molds that you pour plaster or resin into. The output is effectively LEGO blocks designed specifically for creating terrain. And the results speak for themselves.


Photo from HirstArts.com showing the potential with the cavern system molds.

Photo from HirstArts.com show the potential with the Gothic setting molds.

Photo from HirstArts.com showing the potential with the Inn Builder molds.

Now most people look at these photos and immediately fall in love but at the same time start cringing at the thought of the cost involved. And I'm not going to lie, to create everything you see above would cost quite a bit due to the number of molds you would need to buy.

BUT... What is you could start creating terrain for approximately $100? 

Because that's all it really takes to get started. For about $100 you could create terrain similar to what you see below. The best part is, you can make as much terrain as you like, because once you have the molds, you only need to buy more plaster to go into the molds and then you can just keep creating.

Photo from HirstArts.com showing a basic dungeon setup.
To create the pieces above all you need is two molds. You can get them for $63 (postage not inc) from the Hirst Arts Store. The molds required to build a dungeon that looks like this are:

Gothic Dungeon Builder #45
Floor Tiles Various Sizes Mold #201

You will also need something to pour into the molds. Don't bother with Plaster of Paris. It will chip. You want to look for something like Hydrastone or Merlin's Magic. I personally use Hydrostone which I can pick up 22.6KG for $49.50. This make's a metric shit tonne of dungeon!

You're going to need a few other things. But you probably have some of the stuff lying around at home. For details on how to cast check out these instructions.

With your molds and plaster in hand it's as difficult as following the instructions provided, the result will be an amazing Gothic themed dungeon!

There's really not a whole lot to it. You can create professional looking dungeons that are comparable to the mighty Dwarven Forge but for the price of one of their sets you can instead own the molds and create a much larger quantity of dungeon pieces.

Obviously only having two molds is going to limit you to creating specific looks. But this is just a starting point. You can simply buy new molds to create new looks and completely different terrain!

I've had so much fun working with Hirst molds. I seriously recommend checking it out for anyone wanting to bring some 3d terrain to their table!

Hirst Art molds with plaster poured.
Some pieces straight out of the molds.
My first floor and mold pieces, Playing around with different configurations.
Some painted pieces.
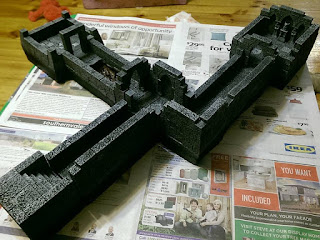
My first dungeon pieces made mainly with the molds listed above.
My first dungeon pieces painted. 
How large you build is up to you.


Friday 21 October 2016

Realm Works - Creating Worlds

I run through a tour of how I setup the D&D world within Realm Works. Starting with the Planes of Existence and zooming all the way in to a planet, body of land, location and even the NPC living in that location within the world.


Sunday 16 October 2016

Upgrading the Projector Setup

I finally got sick of the huge mirror cutting my game room in half. It worked well to bounce the projector image onto the table, it certainly made a large output, but it made the room feel cramped.

Here's what the old mirror looked like. It was ugly and made the room feel cramped!


The projector was mounted to the roof, aimed at the huge mirror which beamed the image onto the table. It created a massive image which spanned 2x trestle tables which was great but ultimately the picture was weak and the keystone correction was completely off.


So i set about trying to replace the huge mirror with something more suitable that would be mounted to the roof.

I went down to our local scrap-yard and scored a huge win. A huge piece of First Surface Mirror just sitting there begging to be brought home. It was a full body length piece! I couldn't believe my luck when the lady at the front only charged me $7 for the whole thing!

I purchased a glass cutter to get it to a better size and mounted it to some wood with liquid nails. Added a hinge and mounted into to the roof.

The result have been a significant improvement. The image in clearer and brighter. The image beams straight down to there is very little shadowing beneath the models now and the keystone correction is now perfect.

Testing the positioning for the mirror. 

Mirror installed, playing around with the angle.

Happy with the position and angle and gave the mirror a clean.
The town of Red Larch beaming to the table. 

Temple of the Crushing Wave with Fog of War. 

I had to remove the original lights to make room to mount the mirror. I went with this spider like light system allowing me to install a light behind each side of the table. Also in the process of getting a dimmer switch installed to allow greater visibility of the table while still enabling light. 


A shot of my game room in all it's messy glory. You can see the table projection working and the extra monitor above my DM station. I use this to display monsters, npcs and handouts from Realm Works to my players. 

A closer shot of the setup as the players see it.
The view from my DM station. 

Overall both myself and my players are much happier with this setup. Well worth the investment.


Friday 14 October 2016

Realm Works - Prepping a Module

This video is probably a bit long winded for most but I took a crack at showing the process of entering a PDF into Realm Works. It might be of interest to some.


Realm Works - Working with Timelines

Today i uploaded a video showing some of the functionality within Realm Works used to track timelines. Check it out.


Wednesday 5 October 2016

Realm Works and Hero Lab - Working With Monsters

Today I show some ways you can work with Hero Lab monster portfolio's within Realm Works. Use the power of Hero Lab to quickly and very easily make variant monsters to challenge your player's with.


Next you can see how easy it is to create custom monsters and make them forever available as an option from within Realm Works. Using this method you can easily play with 3rd party content.


Tuesday 4 October 2016

Realm Works and Hero Labs - A GM/DM Tour

Today I present a tour of Realm Works and Hero Labs for any interested Dungeon Masters out there.

This is a really powerful suite of software that goes a long way to assisting DM's with the sometimes overwhelming yet rewarding task. 

Check out the video below and leave any thoughts in the comments.