Showing posts with label Hirst Arts. Show all posts

Sunday, 4 December 2016

Hirst Arts - Started a modular village!


For a long time now I have being fighting an internal war.. I have alot of terrain, it's all modular and I can make alot of different environments out of it. It's also very functional. My buildings are all open top so that my players can interact inside. But ultimately, when I made a village, it didn't look like a village. It didn't have the right atmosphere.

This is what is looks like when I setup a village scene using my current design.


So while this didn't give the town look and feel it allowed for great game play. Buildings were represented, my players could interact with them. Deep down though I knew it was only a matter of time before work began on a real village. Something you would look at and go wow.

So I bought the following molds:

Half Timber Mold #225 - $29.00
Wood Shingle Roof Mold #240 - $29.00
Stucco Panel Mold #251 - $29.00

And work began. 

Now my terrain largely works on a 5x5 grid. So ultimately I wanted to ensure the buildings adhered to the same system. The smallest building would be on a 5x5 base and increment in units of 5 from there (10x5, 10x10, etc).

Following along with the tutorial provided over at the Hirst Arts website. '

The walls were made from the Stucco panel mold and glued to the back of some cereal box. The panels were undercoated with cream and then dry  brushed with white to bring out the detail.

I played around different layouts using the wood from the Half-Timber mold. 
 <Insert Pic Here>
I purchased some double-sided tape and used that to stick all the wood pieces to so that I could efficiently paint it. They were spray painted black and then dry brushed brown.

The timber was glued to the stucco panels. The sections that over-lapped the edge were snapped off.
More panels with wood work added. 
I made a base from 5x5 grids using the 'Floor Tiles Various Sizes Mold #201'. From there the wall sections we're glued into place. 
Front view with the walls up.

The roof was added.

And finally, the 'nearly' finished product now slots perfectly in alongside my other 5x5 tiles. Now I just need to make alot more buildings to create a full village!


Friday, 28 October 2016

What is this Hirst Arts?


So one of the constant thing's I see on social media circles is people posting photos of Hirst Art terrain that they have made. The response is always fantastic and there's always a handful of people who reply stating they wish they could afford or were artistic enough to create such terrain.

First off, if you are one of those people get on over and join DM Scotty's Craft N' Games. It's a Facebook group dedicated to creating terrain and RPG material. It's focus is on making things from cheap household items and the stuff you see posted daily is incredible.

However, just from reading my blog you should know that I work mainly with Hirst Arts. Bruce Hirst is the artist responsible for Hirst Arts. He creates silicon molds that you pour plaster or resin into. The output is effectively LEGO blocks designed specifically for creating terrain. And the results speak for themselves.


Photo from HirstArts.com showing the potential with the cavern system molds.

Photo from HirstArts.com show the potential with the Gothic setting molds.

Photo from HirstArts.com showing the potential with the Inn Builder molds.

Now most people look at these photos and immediately fall in love but at the same time start cringing at the thought of the cost involved. And I'm not going to lie, to create everything you see above would cost quite a bit due to the number of molds you would need to buy.

BUT... What is you could start creating terrain for approximately $100? 

Because that's all it really takes to get started. For about $100 you could create terrain similar to what you see below. The best part is, you can make as much terrain as you like, because once you have the molds, you only need to buy more plaster to go into the molds and then you can just keep creating.

Photo from HirstArts.com showing a basic dungeon setup.
To create the pieces above all you need is two molds. You can get them for $63 (postage not inc) from the Hirst Arts Store. The molds required to build a dungeon that looks like this are:

Gothic Dungeon Builder #45
Floor Tiles Various Sizes Mold #201

You will also need something to pour into the molds. Don't bother with Plaster of Paris. It will chip. You want to look for something like Hydrastone or Merlin's Magic. I personally use Hydrostone which I can pick up 22.6KG for $49.50. This make's a metric shit tonne of dungeon!

You're going to need a few other things. But you probably have some of the stuff lying around at home. For details on how to cast check out these instructions.

With your molds and plaster in hand it's as difficult as following the instructions provided, the result will be an amazing Gothic themed dungeon!

There's really not a whole lot to it. You can create professional looking dungeons that are comparable to the mighty Dwarven Forge but for the price of one of their sets you can instead own the molds and create a much larger quantity of dungeon pieces.

Obviously only having two molds is going to limit you to creating specific looks. But this is just a starting point. You can simply buy new molds to create new looks and completely different terrain!

I've had so much fun working with Hirst molds. I seriously recommend checking it out for anyone wanting to bring some 3d terrain to their table!

Hirst Art molds with plaster poured.
Some pieces straight out of the molds.
My first floor and mold pieces, Playing around with different configurations.
Some painted pieces.
My first dungeon pieces made mainly with the molds listed above.
My first dungeon pieces painted. 
How large you build is up to you.


Monday, 11 April 2016

Hirst Arts Pirate Ship

Ever since I completed my first ship build I knew I had to make something bigger. In my head I am planning an epic sea campaign and you can't run that without boats!

You can find a tutorial on how these boats are made HERE.

Eventually I will add rolled up sails to the masts. This will give the impression that the sails exist while not impeding on game-play.


Modular Castle

So work has begun on my modular castle.

Progress has been slow, but that really should be expected with a 12 week old pooping around the house.

A modular castle is something that I knew I would simply have to build ever since finding out we were having a little boy. I can;t imagine bringing up a boy in a house-hold where castles, dragons and fantasy in general are not a part of every day imagination.

Thus started this build.

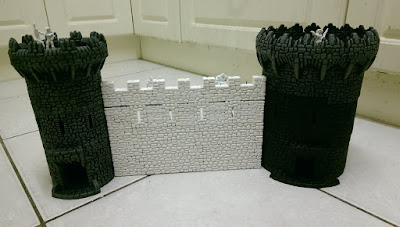
I already had some completed towers.


Note: Turns out you can stack towers :)


Before starting a build I always do research on what is available. Having spent countless hours pumping out bricks for the Tomb of Horrors I was keen to find something more efficient. As such I quickly purchased the Fieldstone Slab Mold #261 from Hirst Arts. This was appealing as it lets me create a huge chunk of wall in a single pour.


The mold arrived and I was not disappointed. Even without glue I could make a satisfying wall.


With the ability to make the walls under control I started planning the build; and this is where things just did not work. I had decided on the following rules for the build:

It must be modular.
All pieces must be usable on their own (eg: towers should be usable as wizard towers)

My entire system is based on a 5"x5" grid. All of the pieces I have made to date are glued to a base and are all interchangeable. The tower molds only come in 3", 4", 6" and 8" however, which means there is no way I could glue them to a base and still have them align in a satisfying manner.

I have played this idea around in my head a million times. Nothing I thought of would work with my standard setup. As such I have started building with the idea of not gluing the walls or towers down to the base. They will be movable and I will need to have adequate bases to go underneath.

My next step was to design the walls. For this i used a program called SketchUp. I had never used this application previously but I was delighted to learn that there is a wealth of pre-fab Hirst Arts models available to play around with. It was really like digital lego!

SketchUp / Hirst Art Pre-Fabs

Using this tool I was able to test out some various builds. I was quite unsure which variation I wanted to use. I still feel like the gap between the top of the tower and the top of the battlement on the 2 level wall is too small. But i feel like the 1 level wall is too low. A player could jump over it with a Ring of Jumping which is something I simply had to avoid.


I finally decided on building the walls as 2 levels and proceed to start casting the necessary blocks.

Tonight I finished building the first wall section.


Overall I'm happy with the results. I plan on making at least 6 of these pieces which will enable me to make a fairly significant castle. Also need to make a huge gatehouse with a draw bridge.


Sunday, 13 March 2016

Tomb of Horrors - 3d Build (Pictures of complete layout)


Welcome to the Tomb of Horrors

My party just finished their first ever run through the Tomb of Horrors. Well, finished is a term i use loosely. They walked away alive, so that's an achievement right?

The majority of the build is made from Hirst Art molds.
The lava tile's are made from 4-Bot Industries molds.
Some of the dungeon dressings were made from Lady Sabelle Designs.
The Green Daemon Face was made and replicated by me.

Disclaimer: This post contains ALL THE spoilers. DO NOT PROCEED if you are planning on playing this dungeon. It's too much fun to spoil. 

If you have not run this dungeon... get onto your DM :) It is player breaking, demoralizing, it will likely kill you, but the take away stories are great!

The module can be purchased HERE.


1. FALSE ENTRANCE TUNNEL 1


2. FALSE ENTRANCE TUNNEL 2


3. ENTRANCE TO THE TOMB OF HORRORS


4. FRESCO OF THE WIZARDLY WORK ROOM and 7. THE FORSAKEN PRISON


5. THE ARCH OF MIST


6. THE FACE OF THE GREAT GREEN DEVIL


7. THE FORSAKEN PRISON


8. GARGOYLE LAIR


9. COMPLEX OF SECRET DOORS


10. GREAT HALL OF SPHERES and 10A. Magic Archway


11. THE THREE ARMED STATUE


12. TRAPPED FALSE DOOR


13. CHAMBER OF THREE CHESTS


14. CHAPEL OF EVIL
14A. Opalescent Blue Altar: 
14B. Archway of Glowing Orange


15. STONE GATE


16. LOCKED OAKEN DOOR


17. MAGICAL SECRET DOOR


18. FALSE CRYPT PROTECTED BY FEAR GAS


19. LABORATORY AND MUMMY PREPARATION ROOM


19A - The Large Vats


I provided actual jars for the players to stick their hands in :-)
Acid was vinegar
Dirty Water was coffee

The third jar contained a very sludgy combination of Corn Flour and water. 


20. HUGE PIT FILLED WITH 200 SPIKES


21. THE AGITATED CHAMBER


23. THE CAVERN OF GOLD AND SILVER MISTS


23. FALSE/TRUE DOOR


24. ADAMANTITE DOOR


25. THE PILLARED THRONE ROOM


A. Devil Face


C. Charred Remains


D. Ebony Dais and Silver Throne


26. SMALL ROOM WITH A DOOR OF ELECTRIC BLUE


27. THE PORTAL OF SCINTILLATING VIOLET


A. The Chamber of Hopelessness


28. THE WONDROUS FOYER
29. THE VALVES OF MITHRIL
I didn't build this to the extent I would have liked. This is a very unique room that I felt would not be used in my modular setup if I painted and built it to the extreme. With that said I may redo this piece...


30 THE FALSE ROOM
a. The Bronze Urn
b. Granite Sarcophagus
c. Iron Chests


31. ONE WAY DOORS
32. SECRET DOOR


33. THE CRYPT OF ACERERAK THE DEMI-LICH


THE WHOLE THING TOGETHER


A summary of what happened... aka 'Why you don’t mess with wish magic!'

The stand out points from last nights session


Campaign History: The party were staying in the Deadly Depth Inn at the base of Mount Hotenow. An infant was kidnapped form the inn which the party later discovered was kidnapped by Drow. They chased those Drow down into the Underdark in a campaign that spanned the last year.

As they neared Menzoberranzan they encountered Bregan D'aerthe lead by Jarlaxle who gave them a choice. Die by our hands or enter the Tomb of Horrors and return to me the treasure you find.

This is how that campaign ultimately… sort of ended… well at least reset


/Fast forward to the last half of the Tomb of Horrors!

The sorcerer tapped the silver end of the scepter onto the door @29 teleporting himself naked back to the start of the dungeon.

The Barbaric Paladin who didn't pay attention to Sorcerer did exactly the same thing.

The Barbaric Paladin and Sorcerer proceeded to make their way back to the party stopping to fashion some socks and jocks out of the dead snakes. Unfortunately they lacked the necessary equipment to unlock the Obsidian door @24 making it impossible for them to return to the party.

As such they decided to investigate 23A. They opened the door and fell instantly unconscious for 8 turns. A juggernaut started rolling down the corridor towards them coming to a stop just in front of Sorcerer. Unfortunately for the Barbaric Paladin who was in front of Sorcerer and ultimately got squashed dead.

BOOM MY FIRST EVER PLAYER KILL


Sorcerer relayed this information to the team who we're all quite depressed with the exception of our now evil Sorcerer (he went through the wrong door earlier) who proceed to have a laugh about it with the local Nymph.


Monk, Cleric and Fighter proceeded into the treasure room (30). Spending about 3 hours tippie towing around for no reason as they were afraid the Metal Statues would come to life and destroy them. Fighter eventually popped the gold stopper on the smoking urn @30 releasing an Efreeti who granted him 3 wishes.

Wish1: I wish the Efreeti to follow me until the 3 wishes are granted.

Wish2: I wish for our entire party to be teleported to the start of the dungeon with all our gear, all our health and all our knowledge of the dungeon.

Sure no problems said the Efreeti.


The party blink and they are standing back in the gorge in from of Jarlaxle and some of his companions.

Jarlaxle laughs.

The party realize they are standing there naked next to a pile of chests which can only be assumed to contain all of their equipment.

At this point the players all went outside of the room to plan the 3rd wish. They obviously had a plan they did not want me to know about.

Jarlaxle proceed to offer the party a deal. Step away from the chests and he would let them live and he would arm them with standard armor and weapons of their choosing.

The party reacted in a way I did not see coming.

They agreed.

Jarlaxle came good on his promise. Members of Bregan D'aerthe appeared through a portal and surrounded the players. Two of the Drow came and took the chests of equipment away. The others provided armor and weapons to the party and were even nice enough to return the casters arcane focus.


The players then proceeded to go back through the portal that would return them to the Tomb of Horrors?

At this point in time the clever Fighter made his third wish.

Wish3: I wish the entire party was back at the Deadly Depth Inn in full health with all of the gear that Jarlaxle just took.

The player's blink and appear back at the Deadly Depth Inn. They are still wearing the same armor and carrying the same weapons that the Drow just gave them. Their original magical items are however missing?

Everyone look's confused except the Barbaric Paladin...

"Jarlaxle didn't take the gear... two random Drow did!"

And that is how this yearlong campaign just got randomly reset over nothing more than a conversation.

I'm sure everyone is now sitting down in a booth having a beer trying to convince the Barbaric Paladin, who took an Oath of Vengeance against the kidnappers, that they really don't care enough about the baby to go after her again...

Thanks for playing the Tomb of Horrors guys :) And perhaps next time...